
Fudgy chocolate & orange gateau
By Sarah Cook
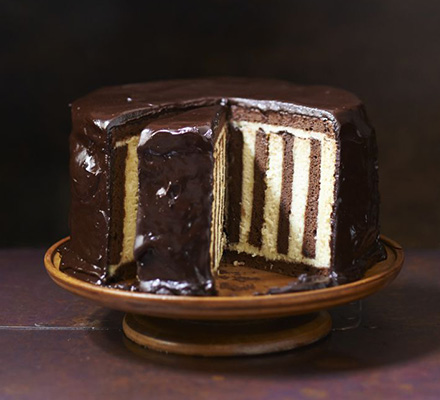
This sensational striped sponge requires careful assembly and lots of preparation to perfect the decoration, so set aside a good chunk of time in the kitchen. We’ve got a Guide to help you every step of the way, see the Tip box below
- Takes a day in the kitchen
- A challenge
Nutrition per serving
-
kcal 765
-
fat 44g
-
saturates 26g
-
carbs 81g
-
sugars 69g
-
fibre 3g
-
protein 10g
-
salt 0.7g
Ingredients
- flavourless oil, such as sunflower, for greasing
- icing sugar, for dusting
- 40g butter
- 3 large eggs, separated into yolks and whites
- 75ml whole milk
- ½ tsp vanilla extract
- 30g plain flour
- 30g cocoa powder
- 75g golden caster sugar
- 40g butter
- 3 large eggs, separated into yolks and whites
- zest and juice 1 orange
- splash of milk (if needed)
- ½ tsp vanilla extract
- 80g plain flour
- 75g golden caster sugar
- 350g unsalted butter, at room temp
- 600g icing sugar, sifted
- zest and juice 2 oranges, at room temp
- 100g butter
- 200g icing sugar
- 100g cocoa
- 100g dark chocolate, chopped
- 200ml double cream
- 1 tsp vanilla extract
Tip
How to perfect your gateauWe have a comprehensive Guide to preparing, making, icing and assembling your gateau, including step-by-step images. You can find it here.
Divide your kitchen into zonesCreate a lining and filling space and clear a table for cooling the finished sponges. Then make sure you have a bowl of soapy water ready for washing up. Find out more here.
What kit do you need?You'll need equipment for measuring, melting, mixing and baking. Find a full list here.
Using up your leftoversUse up your sponge trimmings in a trifle, or dice and freeze them in chunks. Find out more here.
Method
Making the sponges: Heat oven to 180C/160C fan/gas 4. You’ll need to make 3 rectangular chocolate sponges, a pair of round chocolate sponges, and 3 rectangular orange sponges to assemble this cake, so get everything organised first. Take a look at our Guide and the additional tips, in the Tip box below.
For every rectangular sponge, you’ll need to line the base of a 21 x 31cm tin (see Guide in the Tips below and Related guides box, right) neatly with baking parchment and grease the sides with a little flavourless oil.
Start with the chocolate sponges. Put the butter in a small saucepan and heat gently until melted. Whisk together the egg yolks, milk and vanilla extract in a small bowl. Stir the flour and cocoa into the melted butter to make a paste. Transfer this butter-flour mixture to a big mixing bowl and whisk in the egg mixture a little at a time – this takes elbow grease to get it smooth, but keep going!
Put the egg whites in a bowl and beat with an electric whisk until stiff. Add the sugar and continue beating until the mixture is glossy and thick. Whisk a third of the meringue mixture into the chocolate mixture to loosen, then use a big metal spoon to gently fold the remaining meringue into the batter until just incorporated. Spread the batter evenly in the tin. Bake for 12 mins.
Turn the cake out of the tin onto baking parchment very lightly dusted with icing sugar. Peel off the cake lining parchment and cover with a clean tea towel.
Repeat steps 2 to 5 twice more. When the third rectangular sponge is baked, turn out as before but very loosely roll up the sponge like a Swiss roll, starting from one of the shortest sides, rolling up the tea towel inside.
Make a final, fourth batch of the chocolate sponge recipe, but this time divide it between 2 x 20cm round, shallow sandwich tins. Bake for 10 mins, then turn out as instructed in step 5.
Now make the orange sponges. Follow steps 3 to 6 again, but instead of milk, measure 75ml of the juice from the orange you’ve zested. If you don’t have enough, make up the difference with milk. Whisk in the zest.
Cool all the sponges.
Making the frosting and icing: For the orange frosting, beat together the butter, icing sugar, orange zest and juice. Beat until just combined – the acidity of the orange may start to split the mixture if overbeaten. If it looks a little split though, don’t worry – just stop mixing, it’ll still taste lovely. Can be kept in the fridge for up to 3 days, but will need bringing back to room temp to use.
When you are about to start assembling, put all the chocolate icing ingredients in a heatproof bowl over a pan of barely simmering water. Gently melt together, stirring occasionally, until smooth and shiny.
Assembling the cake: Cut each rectangular sponge into 2 long strips 7cm wide – trimming the long edges off will give you a neater finish (see step A in the Guide). It’s important to be really accurate, so use a ruler. Trim the short edges to neaten. When you prepare the rolled-up sponges, just gently unroll first – don’t worry if they crack a bit.
Spread a thin layer of orange frosting over every strip, right to the edges. Gently peel the strips away from their paper – they will have stuck a bit. Start with 1 chocolate and 1 orange strip that was rolled up to cool, and lay one on top of the other – but don’t line up the ends. Sit the second sponge about an inch down from one of the ends of the bottom sponge (it doesn’t matter which is chocolate and which is orange). Start to roll up from this end – the bottom sponge should roll up and over neatly on top of the second, so the middle of the roll is nice and tight (see step A in the Guide).
Keep adding extra sponges and rolling up to make a giant Swiss roll but as you roll, the ends of each different-coloured layer won’t finish together (and this difference increases as the roll gets bigger). So you’ll need to add chocolate and orange sponges individually from now on, rather than sandwiching together first, then adding to the rolled cake. Where each strip ends, you’ll stick on a matching sponge – so a chocolate strip always continues with another chocolate, and the same with orange (see steps C & D in the Guide). This is the fiddly bit, as you’ll find you’ll need to partly stick on 1 coloured strip, then snuggle in the other coloured strip partway through. (This sounds more complicated than it is. When you start to do it, this will all make sense.) If you have a spare pair of hands in the house, this is the time to use them.
It’s up to you whether you find it easier to work as a roll (see step E in the Guide), or to turn the roll on one of its flat ends to work with (see step F in the Guide). I started rolling, and just as it got towards the ends and was getting quite heavy and bulky, I flipped it to continue. Have the round sponges to hand as you near the end, to check whether you’ve reached a roll of 20cm diameter plus. As soon as you do, stop – you may have 1 strip of 1 colour left over.
Sit the rolled cake on one of its flat ends if you haven’t already. Spread a good layer of orange frosting over the top, then press on 1 of the round chocolate sponges (see step G in the Guide) – line it up to the middle of the roll, rather than one of the edges of the roll. This means you’ll have to take a sharp knife and trim the roll all around, until it is perfectly flush with the round sponge top. Flip the cake upside down onto your serving plate. Spread some more orange frosting over the new top, and add the second round sponge.
Gradually spoon on, and spread over, the chocolate icing with a big palette knife. If should still be runny enough to gently run down the sides, giving you a shiny finish (see step H in the Guide).