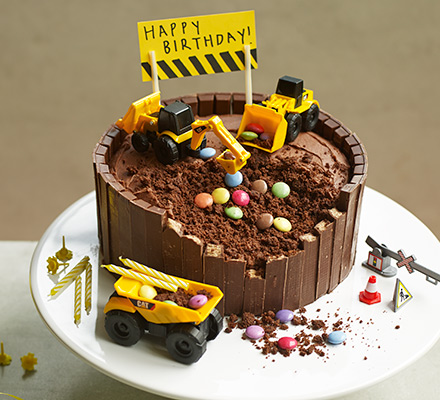

Digger cake
By Jane Hornby
You don’t need to be an engineer to make this impressive construction site chocolate birthday cake, just a few toys, some KitKat bars, sweeties and creative flair
-
Prep:20 mins
Cook:25 mins
plus cooling and decorating - Serves 20
- Easy
Nutrition per serving
-
kcal 451
-
fat 25g
-
saturates 16g
-
carbs 50g
-
sugars 37g
-
fibre 2g
-
protein 5g
-
salt 0.32g
Ingredients
- 250g pack unsalted butter
- 50ml whole milk
- 150g whole natural yogurt
- ½ tsp vanilla paste or extract
- 3 large eggs
- 250g light muscovado sugar, any lumps squashed
- 250g self-raising flour
- 2 tsp baking powder
- 50g cocoa powder
- 2 tbsp cocoa powder
- 2 tbsp milk, plus 1 tsp more if needed
- 200g unsalted butter, very well softened
- 300g icing sugar
- 1 tsp vanilla paste or extract
- large round cake board or a large flat plate, about 13inches/33cm
- 2 plastic diggers and one dumper truck, or similar
- 9 four-finger KitKat bars
- handful Smarties or other coloured sweets
- marker pen
- 10 x 5cm rectangle of yellow cardboard
- 1 drinking straw
- sticky tape
Method
Heat the oven to 180C/fan 160C/gas 4. Use a little of the butter to grease the sides and bases of two 20cm sandwich tins. Melt the rest of the butter in a small saucepan. Off the heat, add the milk, yogurt and vanilla, followed by the eggs. Beat well with a fork.
Put the dry ingredients plus ¼ tsp salt into a large bowl. Whisk to combine – this aerates and saves sifting. Tip in the wet ingredients and whisk to a smooth, silky batter.
Don’t hang around at this point. Pour the batter evenly into the prepared tins and put onto the middle shelf in the oven. Bake for 25 mins or until risen and a skewer inserted into the middle of the cakes comes out clean. Cool for 10 mins in the tins, then carefully invert the cakes and leave to cool upside down on a cooling rack.
Make the buttercream. Stir the cocoa into 2 tbsp milk until smooth. Put the butter into a large bowl and sift the icing sugar on top. Add the cocoa mixture, vanilla, and a pinch of salt. Beat for a few mins with electric beaters until creamy and spreadable. Add the extra 1 tsp milk if you need to.
Place one of the cakes towards the back of the board or plate, and fix it with a little of the buttercream to stop it slipping about. Spread with ¼ of the buttercream.
Sandwich the second cake on top. With a small, serrated knife, cut away a scallop-shaped crater from the top cake. Cut about half way down into the sponge and removing about a quarter of the top of the cake. Keep the piece you remove. Position two diggers on the top of the cake to see if your crater is about the right size and shape, then set them aside again.
Using a palette knife, paddle the rest of the buttercream evenly over the top of the cake and down its sides. Make sure that the edge of the excavated area is defined.
Snap the ends from enough of the KitKat fingers to follow the edge of the excavated area, then press them into the buttercream. Now fix the rest of the whole fingers around the side of the cake.
Crumble the cake that you removed in step 6, to make soil. Part-fill the excavated hole with the soil, adding a few Smarties, if you like. Position the diggers on top and put some soil and Smarties into their buckets.
Fill a lorry or dump truck with more crumbs and Smarties, and let some of the soil and spill over the edge of the cake and the broken KitKats.
Use the marker to write your message on the card and draw some diagonal black lines. Cut the straight part of the straw into two equal pieces, then fix these to the back of the card with tape to make a sign. Position the sign at the back of the cake. If the sponges are used fresh or within a day of baking (wrap well once cooled), the finished cake will keep in a cool place (not the fridge) for 2 days.